The RV lifestyle offers the experience of traditional camping without losing out on your home comforts. With a little knowledge of your RV electrical system, you can feel confident in keeping the lights on wherever your adventures may take you.
A Guide to The Electrical System in Your RV
Camping with a recreational vehicle is a great way to experience nature and explore the wilderness, without having to leave behind the comforts of modern technology. Hello, has someone plugged in the coffee maker and made my morning espresso yet!
It is like having a house on wheels. However along with the conveniences also comes the same maintenance issues that you might have in your home or even your car.
Don’t let this intimidate you though. With a little preparation and education, RV owners can understand how their RV electrical system works and be ready to solve any minor electrical issues that may come up.
This quick and easy tutorial will explain your electrical RV system for you and make sure you’re prepared for a stress-free and hassle-free vacation.
Understanding Your RV Electrical System Includes:
- Electrical safety
- How electricity works in an RV
- How to plug into the campground electrical pedestal
- Estimating how much electricity you will consume
- Choosing the right components
- Basic RV electric maintenance to “keep your lights on”
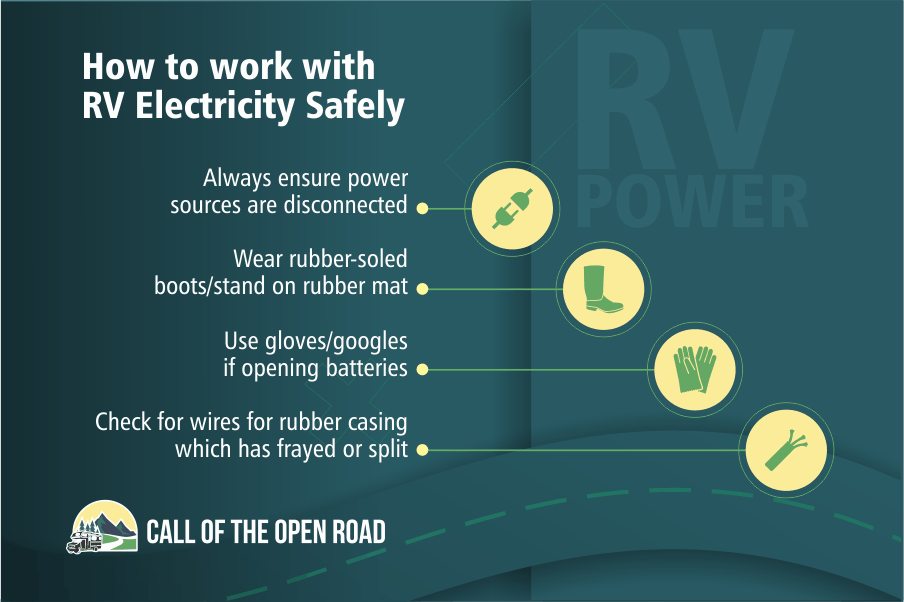
How to Work With Electricity Safely
Before you begin any electrical work, it’s critically important to understand the dangers of electricity and how to keep yourself safe while working on your camper or travel trailer electric system.
Most of us, if we’re lucky, have only seen electrocution in movies and TV shows. The consequences of being shocked can range from a small tingling buzz to complete heart paralysis.
Risks With Electrical Systems
Working on a travel trailer electrical system is unlikely to cause complete heart paralysis which usually only occurs when the voltage is greater than 600 volts. Even so, there are dangers and potentially deadly risks when working with electricity, so be sure to take proper precautions.
The primary danger is the risk of electrocution. Electrocution means injury due to shocks, ranging from very minor to severe. But a secondary danger that comes with working with any electrical power source is the risk of burns.
Both electrocution and burns can result in death if you’re not careful, so be sure to heed all the advice provided by your motorhome manual, as well as licensed mechanics and electricians. If these sources aren’t available, the Canadian Centre for Occupational Health and Safety (CCOHS) has excellent advice and safety procedures.
Safety Procedures for Working Electrical Systems
Conductors and Insulators
Electricity can only pass through materials called conductors. Conductors include wires, metal objects, water (in most cases), and most importantly, the human body.
Materials called insulators can stop an electric current. Insulating materials include rubber, wood, glass, and plastic, among other things.
The most basic method to protect yourself from electrical dangers is through the use of insulators.
In most cases, electricity is trying to find a pathway from the source to the ground. If your body provides this pathway, you’ll most likely suffer some electrocution or injury.
Many injuries occur when the rubber casing around the wires and cables becomes frayed or split, and the wires underneath are exposed. Touching those exposed wires can result in electrocution.
Before beginning to work, check cables for any exposed wires. Connectors, covered in electrical tape or wire caps, will also need checking.
You can also protect your body from becoming a conductor with insulating protective gear. Rubber gloves and rubber-soled boots will provide protection, as well as standing on a rubber mat or a wooden ladder. You should be particularly careful not to stand in puddles or any other water.
Circuit Interruption
If you accidentally become a conductor, and the electricity finds a path to the ground through your body, most systems will have a breaker or circuit interrupter. These are designed to interrupt the pathway of electricity.
It’s important to understand that sometimes a breaker is designed to protect electrical components and equipment, and not for personal safety. If the breaker is designed to protect you, it will be called an arc-fault circuit interrupter (AFCI) or ground-fault circuit interrupter (GFCI).
Whether you’re working with your internal appliances or connecting your recreational vehicle to an external power outlet, you should first check to make sure it has an appropriate electrical circuit interrupter for your safety.
How Does RV Electricity Work?
An RV will most often draw power from its highly engineered “deep charge” battery. These 12-volt batteries are designed to power a limited number of appliances overnight. The battery then recharges during the day as the vehicle’s alternator converts mechanical energy from the engine into usable electric energy.
If the RV isn’t moving during the day, it’s usually connected to a campground pedestal, or “shore power.” These pedestals typically provide 220-volt, 50-amp electricity to quickly recharge the battery and even power many of the energy-intensive appliances inside, such as air conditioning units.
Electrical Measurements
Without a background in electrical engineering, or training as an electrician, perhaps it’s difficult to understand the difference between these common electrical terms. A brief explanation might be helpful to describe what these terms mean.
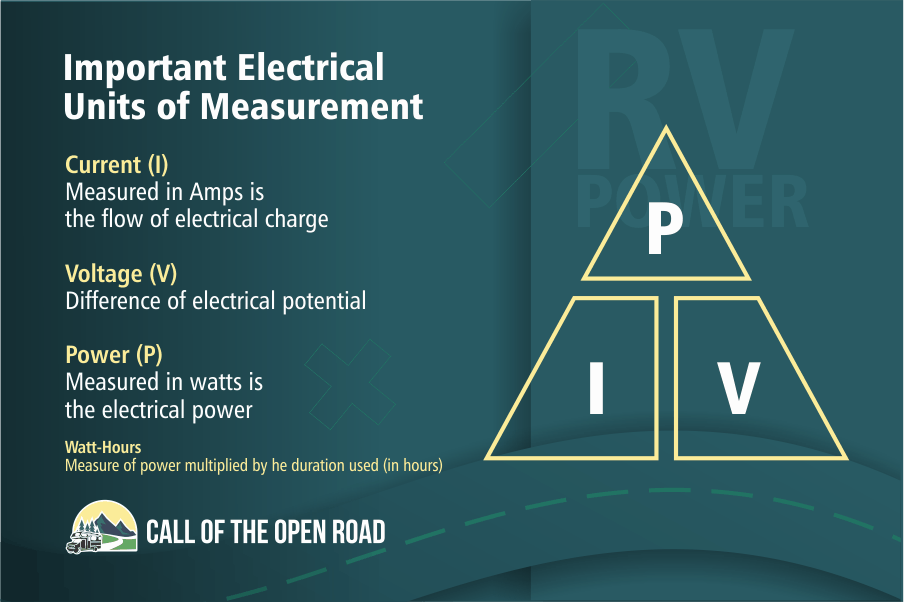
Voltage is also known as “electrical potential.” It describes the difference in electrical charge between two points, typically between a power source and the neutral ground charge or between battery terminals. A greater difference means a larger voltage, and this indicates a greater potential to drive the electrical current.
Amps, which is short for “amperes,” is the unit that measures electric current. Electric current is the movement of electric charge, and this is what causes electrical appliances to work.
Electric current is also what causes burns and muscle paralysis, which has led to the infamous phrase, “Current Kills.” Because of this fact, fuses, breakers, or circuit interrupters are designed to break the electric connection if too much current is passing through.
Watts are the unit of electrical power. Electric power is calculated by multiplying voltage by current. Or more typically, the current is calculated by dividing power by volts, since voltage is relatively constant and the appliance will specify the power requirements.
Watt-hours are a unit of energy, and batteries are usually rated by watt-hours. You calculate this by multiplying the power demand of your appliance by the time you need to use that appliance. For example, a 10-watt appliance, used for two hours, would consume 20 watt-hours. A typical RV battery stores between 100–1000 watt-hours.
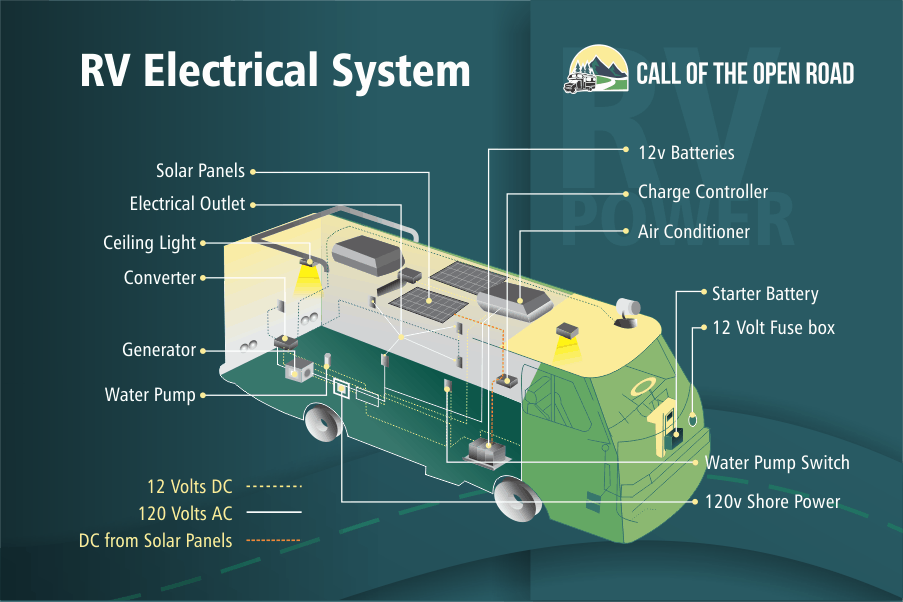
Electrical Systems Within the RV
The first key point to recognize when working with fifth wheels or motorhomes is that it runs on two separate electrical systems: an external power system and an internal power system.
When parked and plugged into a shore power supply, whether at home or at a campsite, this external power is 120 volts AC power. When you’re camping off-grid, you will be running off of your DC 12-volt RV wiring via the house battery.
This handy RV electrical system schematic outlines the main features of these two electrical systems:
120-Volt or 12-Volt?
As we mentioned earlier, voltage is the electrical potential that drives the current. As you’d expect, a municipal connection to shore power will provide a much stronger current. Standard outlets at home, as well as shore supply power connections at a public campsite, both provide 120-volt AC electricity.
But, this is only true in the United States and North America. If you travel to South America or manage to get your RV to an overseas location such as Europe or Asia, you should know that most other countries in the world use 220-volt power outlets. If you’re planning any overseas camping, it’s advisable to rent a recreational vehicle in that country.
Regardless of your location internationally house batteries will typically be 12-volts dc power. The only exception you may encounter is when someone has wired a system with two or more 6-volt batteries (golf cart batteries) in series.
AC or DC?
AC stands for alternating current, while DC stands for direct current. Alternating current means that the current and voltage cycle between positive and negative happens very quickly (in the US, it switches 60 times per second). This type of current is more efficient to send over long distances.
AC current is only produced in power plants or generators. A solar system with photovoltaic panels will produce DC which will be stored in batteries. If you’re charging your battery from an AC power source, such as shore power, you’ll need a charger or converter (called a “rectifier”) to change AC power to DC power.
Typically, an RV electrical system design allows for operation using either AC power or DC power, with RV self-contained electrical outlets dotted around the interior for your appliances. However, there are two exceptions; (1) the water pump and interior lighting systems will (typically) be powered by the 12-volt DC system, and (2) for specific high-load requirements such as your air conditioning system (the other “AC”—don’t get them confused!) will be hooked up to the 110 AC system.
30-Amp or 50-Amp?
Depending on the power demands inside your recreational vehicle, you might have either a 30-amp or 50-amp camper.
Smaller RVs are usually 30-amp, and larger RVs may be 50-amp. You can quickly tell what kind you have by the RV plug attachment – a 30 amp camper plug has three pins, while 50 amp RV plugs have four.

In a pinch, you can always plug your power cord into either type of amp service. All it requires is the proper dogbone adapter. You can plug your 30-amp RV power cord into a 50-amp service without any concerns.
However, if you plug your 50-amp RV into a 30-amp service, you should limit your electricity usage. If your combined appliance usage exceeds 30 amps, you run the risk of overheating and starting a fire.
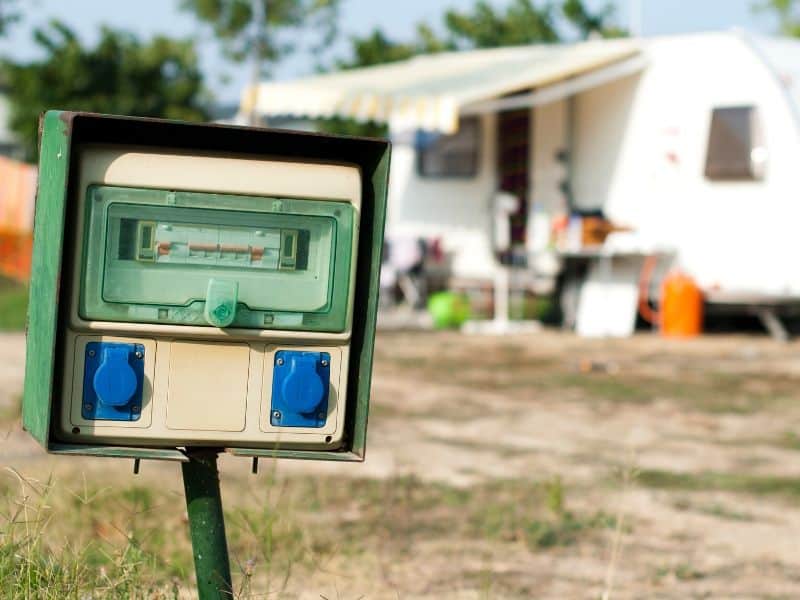
Plugging In at the Campground
At some point, you’re sure to find yourself in front of a campground pedestal, also called a “shore power station.” If you’re looking at one for the first time, you might be confused about the different outlets and switches. This section should help explain the pedestal and any other electrical equipment.
RV Power Outlet Adapters
Campground shore supply power provides a variety of different current levels. To differentiate amps at the station, RV’s use various outlets, these outlets may not fit the camper electrical plug, so you may need an adapter to plugin.
An RV adapter plug is often referred to as a “dog bone” connector because the two heads on a short cable resemble a dog bone.

Dogbone adapters are safe for use as long as you aren’t exceeding the amp draw of the outlet. For example, if you have a 50 amp RV electrical plug, and you use a dogbone adapter to connect it to a 15 amp power source (this is what your house outlets provide), you’ll be safe as long as you don’t draw more than 15 amps.
The power and current requirements for various common RV appliances will be discussed later in this article.
Using Surge Protectors
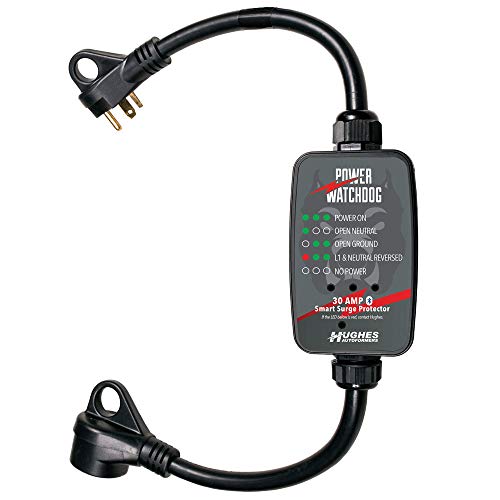
One of the most significant risks associated with RV power systems hooked up to shore power (other than shocking yourself) is that when you’re out in nature, there is the possibility of power surges. A surge may be due to issues in the grid, damage to the shore power equipment or even lightning strikes nearby. These can damage your RV electrical wiring system or even destroy your power system entirely. For this reason, surge protection is vital.
A surge protector is usually integrated into the dogbone adapter.
Check the Campground Wiring
Here is a diagram of a campground’s wiring and the possible outlets you might find:
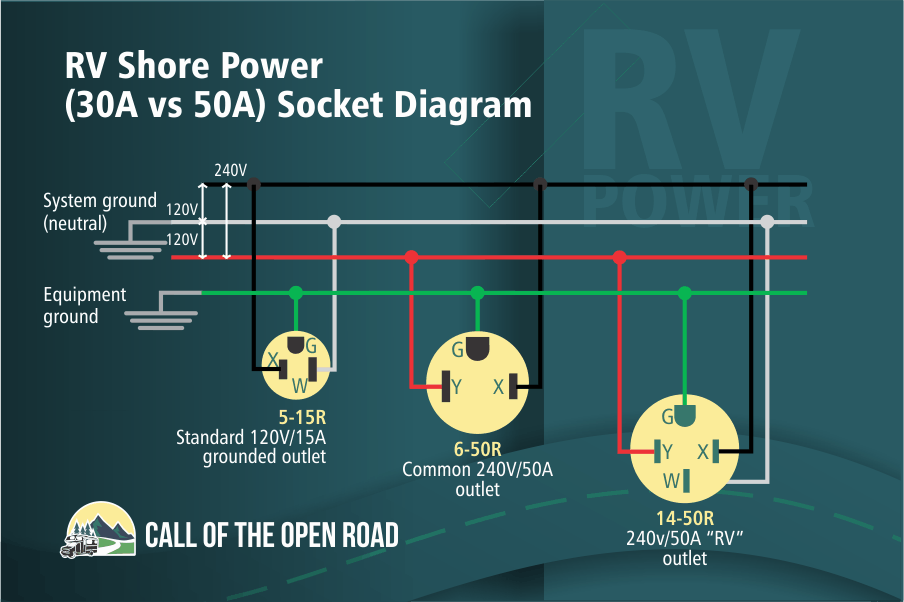
For safety reasons, you should always make sure that the outlet is clean and free of debris. You especially need to check the ground wire connection, shown with a “G” in the above diagram, to make sure it’s not obstructed or corroded. To be extra cautious, you can buy a Non-Contact Voltage Tester to ensure the station is grounded.
After checking the outlet box on the pedestal, you should check the connecting power cord for any damage or wear.
Don’t Have an RV Power Hookup?
If you aren’t camping near a campground with power sources for RVs, then you have a few other options to keep powered up:
- You can carry a diesel or gas generator with you. Generators like these usually consume about a gallon of fuel per hour and can be somewhat noisy.
- You can recharge your battery using solar power panels. Determining how many panels you need will be covered later in this article.
- Your alternator will recharge your battery as you’re driving, so if you drive for long distances between camping nights, your battery may be charged when you arrive.
Electrical Demand: Estimating Your Needs
Before you set off for a camping adventure in the wilderness, it’s good to predict or estimate how much power you use daily. This way, you can make sure your battery is large enough to meet your needs, and avoid overloading the electrical connections in your electrical panel.
Know Your RV’s Appliances
Air conditioners, clothes washers/dryers, microwave ovens, space heaters, and water heaters are usually the most significant power-consuming appliances you may have. You should only use these appliances when connected to a shore power supply, or very sparingly when running on battery power.
Some of your other appliances and electrical devices can draw 15 amps or higher. When using these appliances, it’s essential to know how many amps your shore power is providing.
When connected to a house electrical outlet (15 amps), you may only be able to use one of these appliances at a time. Some pedestals provide 30 or 50 amps, in which case you can operate a few appliances simultaneously.
The appliances that hog the most electricity (and their current requirements) are:
- Air Conditioner (12-16 amps)
- Water heater (9-13 amps)
- Electric skillet (6-12 amps)
- Hairdryer (5-12 amps)
- Microwave (8-13 amps)
- Space heater (8-13 amps)
- Washer/Dryer (14-16 amps)
- Furnace (12-13 amps)
Working Out Your DC System Power Requirements
Before traveling, you should check the power requirements of the appliances and equipment that you expect to use regularly during your trip. You should also estimate how many hours you plan to use each appliance.
Your battery will probably be rated between 30–200 amp-hours. The most expensive luxury RV batteries can be as high as 1200 amp-hours. The amp-hour rating of your battery indicates how much energy the battery contains.
By multiplying the amp requirement of each appliance by the number of hours that you plan on using it, you can calculate your battery capacity requirements. Keep in mind that you should only discharge your battery to 50 percent, and should therefore have a battery with twice as much capacity as you require.
Example:
You have two interior light bulbs (1 amp each) that you’ll run for 2 hours, and a fan (4 amps) that you’ll run for 8 hours. You also have a small refrigerator (5 amps) that is running off a battery charge for 12 hours per day, and you use your microwave (12 amps) for 15 minutes each night.
Your battery system requirement is:
- Lights: 2 x 2 = 4 amp-hours
- Fan: 4 x 8 = 32 amp-hours
- Refrigerator: 5 x 12 = 60 amp-hours
- Microwave: 12 x 0.25 = 4 amp-hours
- Total: 4 + 32 + 60 + 4 = 100 amp-hours
- You need at least a 200 amp-hour battery to safely power all your appliances
Selecting Components for the Electrical System
Choosing the right components for an RV’s electrical system can be the first step in simplifying your maintenance, even making camper wiring for dummies possible.
RV Deep Cycle Batteries
The house battery is the life and heart of your 12-volt DC electrical system. It’s essential to choose a quality battery with enough capacity to meet your daily energy needs.
Battery Capacity
RV battery capacities are measured in amp-hours, and a 200 amp-hour battery will usually cost you around $350–$400.
A 100 amp-hour battery is much more affordable, usually around $170 from your local car parts store. Keep in mind, though, that you should only use a maximum of half the available amp-hours before recharging to maintain the battery’s full lifespan, and 50 amp-hours per night will severely limit what you can use your electricity for.
You can also buy a 35 amp-hour battery for around $75–$80. With this limited capacity, you probably won’t be using any electric-powered appliances inside your recreational vehicle other than interior lights and maybe a small fan.
Deep Cycle vs. Starter Batteries
Deep cycle batteries provide a smaller electrical demand over a more extended period. Conversely, your starter battery needs to provide an intense and short charge to turn the engine.
Many modern batteries are designed to do both purposes.
Types of Batteries
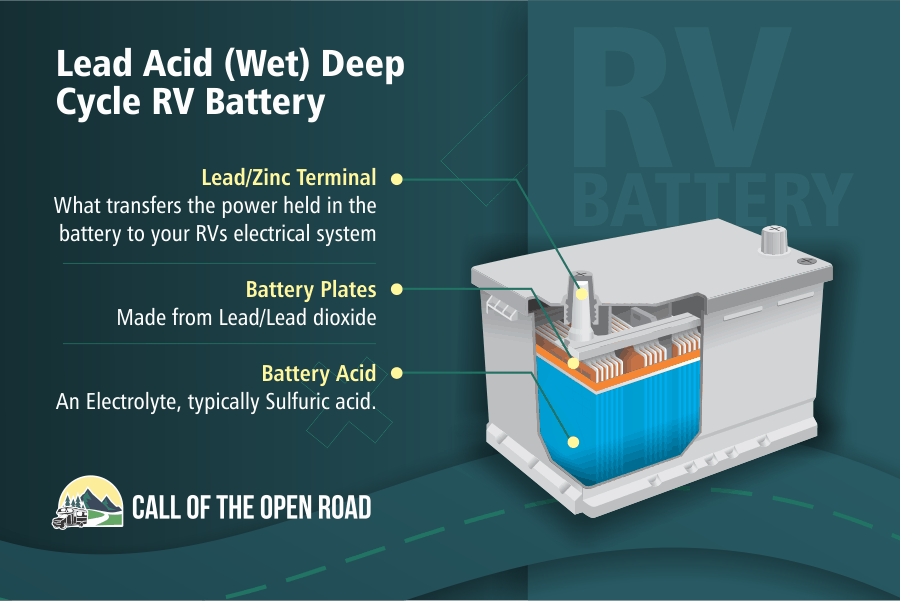
Traditional lead-acid deep cycle batteries are usually of three types: Flooded, Absorbed Glass Mat, and Gel batteries. Newer lithium-ion battery technology is starting to infiltrate the RV battery market, but these types of batteries are not yet common or economically practical.
Lead-acid batteries, also called flooded batteries, hold their electrical charge between sheet lead plates that are fully immersed in an electrolyte solution.
These batteries frequently need to have the electrolyte liquid refilled. This liquid is also vulnerable to freezing at low temperatures as well as to electrolysis, which can separate the water into hydrogen and oxygen gases if the battery is overcharged.
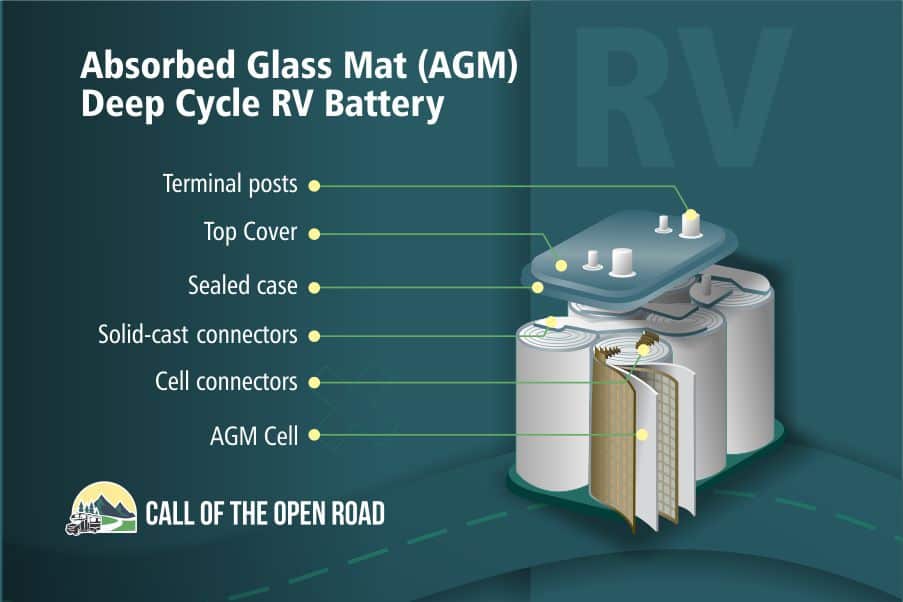
Absorbed Glass Mat (AGM) batteries use glass fiber mats soaked in electrolyte fluid between the electrode plates, instead of suspending the plates in the fluid. This prevents fluid from leaking, freezing, and evaporating.
Gel batteries use a gelling agent in the electrolyte solution to stabilize the fluid. This similarly prevents leaking, freezing, and evaporation. Both gel and AGM batteries are marketed as “maintenance-free” batteries because they do not need any extra fluid refilling.
12-Volt Batteries vs. 6-Volt Batteries
It’s highly recommended to use 12-volt batteries in your RV. This voltage is necessary to turn the engine and also helpful to power appliances inside.
It’s possible to wire 6-volt batteries (such as golf cart batteries) in series to power RV appliances, but this is needlessly complicated and not usually a cheap solution.
Discharging and Recharging
To maintain the lifespan of the battery and prevent corrosion damage, you should never discharge your deep cycle battery more than 50 percent.
There are several ways to charge RV batteries:
- Alternator charging
- Direct hookup to a municipal source (using battery chargers or a converter)
- Generator charging
- Solar panel charging
Your converter or charger usually has an indicator light to inform you that the battery is fully charged. At this point, turn off the power and disconnect the battery. Undercharging can lead to sulfation, whilst overcharging can reduce the lifespan of your battery, so ensure you keep an eye on it when charging.
Inverter/Charger vs. Power Converter
If your rig’s system has a converter, then connecting your RV directly to shore power pedestals will charge your deep cycle RV batteries by “converting” the AC power to DC, while simultaneously, also providing power to your appliances. A battery charger, unlike a power converter, will only charge the battery without powering your RV 12v appliances.
If you plan to rig up a solar system with panels or want to power anything from the 110-volt AC system while off the grid, then you’ll need to add an inverter to your motorhome systems. An inverter does the same job as a converter, but just in reverse – it will convert the direct current power into alternating current.
RV Generators
RV generators usually cost around $1000, and typically consume half a gallon to a gallon of fuel per hour. Unlike batteries which measure energy in amp-hours, generators are measured in watt output. You can use this handy chart to estimate the wattage requirements of your RV.
Monitoring Your Usage
An RV battery monitor system will help keep track of your battery’s usage and remaining charge. It functions much like your vehicle’s fuel gauge.
Solar & Wind: Renewable Energy Options
Instead of having a generator, it’s becoming popular (not to mention environmentally responsible) to use solar panels or wind turbines to power your parked RV and charge your battery. Sizing and estimating your solar panel requirements is like choosing a generator.
Repair and Maintenance
Troubleshooting your RV’s electrical malfunctions might seem daunting, but there are a few simple steps that even a novice can safely perform before consulting a professional.
- Check your fuse box. If any of your fuses have blown, replacing them might quickly solve your problem. Never replace your fuse with a higher-rated fuse.
- Check your battery. This includes checking connections, water level, and battery charge.
- Check your shore power source. If you’re at a campground, this may need staff attention. If you’re at home, check your outlets and breakers.
- Check your generator or solar panels. Your generator might cut off early if you’re low on fuel, and your solar panels might need to be realigned.
- Check your power draw. Turn off your most demanding appliances until things start working again. You may have unintentionally tried to draw more current than is available.
- Refer to the electric RV wiring diagram in this article for extra insights.
Conclusion
Hopefully, this article has given you the confidence to maintain your RV electrical systems, RV wiring, and troubleshoot minor problems. We’ve found that even this basic understanding can be helpful for campers in almost every situation.
If you found this article useful, please feel free to share it with other campers, friends, and family members. If you have any more advice or questions, please add them in the comment section!
Last update on 2024-04-26 / Affiliate links / Images from Amazon Product Advertising API