Camping With Power
Outdoor camping remains one of the most popular recreational or vacation activities in the US. In the USA alone 40 million people own an RV and the industry contributes billions of dollars to the US economy every year.
Many find it hard to completely immerse themselves in nature without a few of the modern conveniences that society has grown accustomed to. These include microwaves, electric heating, air conditioning, and hot water showers.
All of these home comforts require electricity to run and your motorhome delivers this via deep cycle batteries. To ensure the lifespan of your battery and make sure you are never caught short we have put together this guide all about RV battery charging.
Differences Between Your RV Battery and Car Battery
You may think that car and motorhome batteries are similar. While both do use 12 volts the most important difference is how they’re used. You will also find that charging batteries for RVs is different too.
Car batteries create short and powerful energy bursts necessary to start the gas engine. Other than that car batteries only perform a few other low-voltage minor functions, such as powering the radio or operating the power windows.
An RV battery has a much greater responsibility. It powers cooking appliances, water heaters, refrigerators, or even clothes washers and dryers when the vehicle is not connected to the external power grid (known as dry camping).
Charging RV batteries should be done as a rule after 50 percent of the battery has been discharged. Full battery discharge and then recharging will reduce the battery’s lifetime and efficiency. A car battery undergoes continual charging by the car’s alternator when the car motor is running.
Battery Ratings
RV batteries are rated in four different categories:
- Cold Cranking Amps (CCA)
- Cranking Amps (CA)
- Reserve Capacity (RC)
- Amp-Hours (AH)
Cold Cranking Amps (CCA) is the measured current that a battery can produce in cold weather. It’s measured at 0 degrees Fahrenheit and must provide a consistent current for 30 seconds without dropping below 7.2 volts.
CCA is an important rating to ensure that your RV or car battery can turn the engine in freezing conditions. Without this guarantee, your motorhome might not start during cold winter mornings at a campsite, or even worse – in the wilderness.
Cranking Amps (CA), also known as Marine Cranking Amps, are measured at 32 degrees Fahrenheit. This is a much more common temperature condition for starting the engine or for powering RV appliances.
Reserve Capacity (RC) is the length of time that a battery can discharge 25 amps before the voltage drops below 10.5 volts. As you might imagine, the battery voltage slowly decreases as the energy capacity is discharged.
Your battery system needs to maintain a high voltage to power many RV appliances. This is why the RC rating is important, because low-voltage batteries may fail to operate crucial electrical equipment, or worse, damage certain appliances.
Pro-Tip: If you get fed up testing your battery capacity with a voltmeter, consider investing in an RV battery monitor. These devices will give you an up-to-date readout on the health of your RV battery system.
Perhaps the most important rating for a battery is the Amp-Hour rating (AH). This is a measure of the total energy capacity of the battery.
Amp-hours are calculated by multiplying the amps drawn from the battery by the amount of time that the battery can provide that current. For example, if a battery can deliver 10 amps for 10 hours, its rating would be 100 AH.
This is the most important number to understand when considering your recreational vehicle’s electrical demands. You will want to calculate the AH requirements of your most commonly used appliances and make sure that your battery is rated highly enough to meet those demands overnight.
Charging RV Batteries: The Basics
How Batteries Are Charged
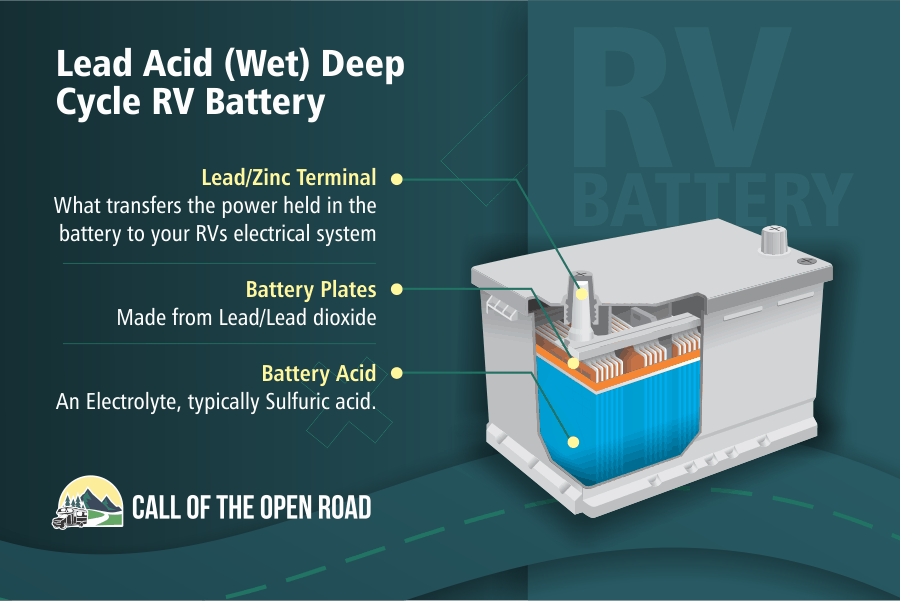
There are several types of RV batteries: traditional lead-acid batteries or wet-cell batteries, absorbed glass mat or AGM batteries, gel-type batteries, and lithium-ion batteries. The main difference between them comes from whether the electrolyte is a fluid, gel, or a mat.
Deep cycle 12-volt batteries are charged when they are connected to a power source with a voltage greater than 12 volts, usually 120 or 240 volts. This drives a powerful current through the electrolyte and polarizes the internal lead plates that store the charge.
Of course, a greater current will charge a battery more quickly. This is why camp power pedestals stations usually provide 30 or 50 amps, compared to your home’s 15-amp outlets. These additional amps can also power the multiple electrical appliances in your RV while charging.
State of Charge
“State of Charge” refers to the level of energy (in percentage of amp-hours) remaining in the deep cycle battery. As the charge decreases, the battery’s voltage will also gradually decline. As mentioned above, this decrease in voltage can negatively impact your RV’s electrical performance.
Below is a table showing the voltage drops at various states of charge:
These values are taken when the battery isn’t currently being used. If there is a current draw on the battery, these voltages will drop even further.
How to Charge Deep Cycle Batteries (Step-By-Step)
In some cases, you may need to charge the battery directly. These steps will help you safely restore power to the battery.
- Make sure you’re parked on level ground and set the parking brake.
- Turn off the engine and all internal appliances.
- Locate the battery or batteries (the motorhome may be powered by more than one battery connected in series or in parallel, and each battery should be charged separately).
- Using a wrench, remove the cables from the battery leads. Remove the black cable from the negative terminal first, then the red cable from the positive terminal.
- If there is any sulfation on the battery’s terminals, scrub them clean with a wire brush and a paste made of baking soda and water.
- Check the water level and refill with distilled water if necessary.
- Attach the converter (or battery charger) cables to the battery in reverse order (red/positive first, black/negative second). The converter is necessary to convert 120-volt AC power into 12-volt DC power for the battery.
- Plug the power converter or charger into the power source and turn it on from the switch panel or circuit breaker.
- Your converter or charger usually has an indicator light to inform you that the battery is fully charged. At this point, turn off the power and disconnect the battery by performing these steps in reverse order. Undercharging can lead to sulfation, and overcharging can reduce the lifespan of your battery, so ensure you keep an eye on it.
These instructions are the same whether you are charging the house battery from a generator, shore power, or using solar panels.
What Happens If You Undercharge or Overcharge Your Batteries?
When charging your travel trailer’s power system, it’s important not to undercharge or overcharge the battery. In this section, we’ll explain the reasons why and also provide helpful tips to avoid under- and overcharging.
Undercharging Your RV Battery
The main risk that you run from undercharging your RV battery, of course, is that you will run out of battery power sooner than expected! This can leave you stranded in nature without lights or heat, and might even prevent you from starting your engine.
This is also an appropriate time to mention that your deep cycle RV battery should rarely if ever, be discharged to less than 50 percent of capacity. If you frequently drain your battery below 50 percent, this will reduce the lifespan of your recreational vehicle’s battery.
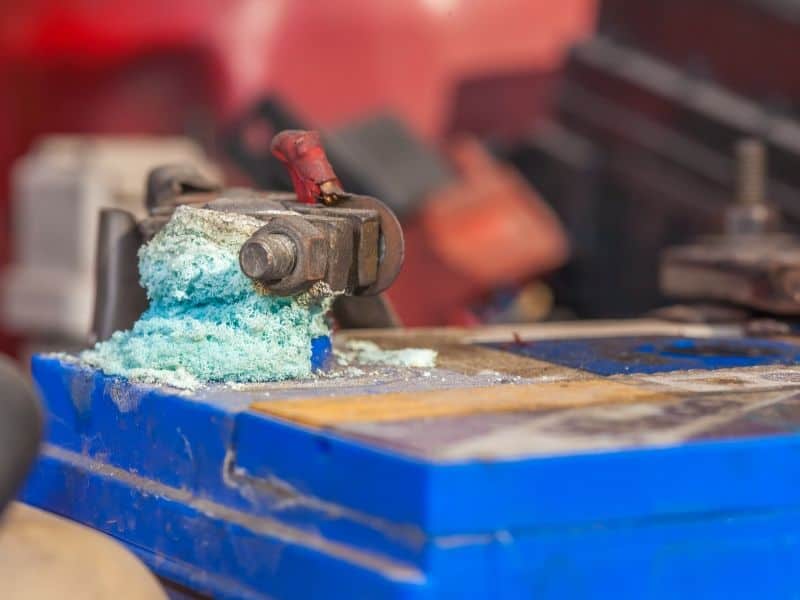
If you have undercharged batteries, it’s likely your battery might be stored for long periods with a low charge. Storing with low charge causes sulfation, the formation of sulfate crystals on the terminals and battery plates. Sulfation is one of the leading causes of unit failure.
There are several ways your battery might end up in a low-charge storage situation but if you leave your battery in your motorhome parasitic drainage might occur.
Parasitic electrical demands come from those small electronics that don’t consume much power and are therefore easily overlooked. However, since they constantly use power, and because they are often forgotten about, they can significantly drain your battery over long periods. Examples of parasitic loads would be your clocks and warning lights.
To prevent parasitic draining remove your battery from your RV during long periods of disuse. However, even when sitting on a shelf, your battery will self-discharge. You might leave your battery alone for several months only to return and find its terminals completely corroded with sulfation.
The best way to prevent low-charge storage problems is through regular (i.e., monthly) use of your RV. Not only will this prevent sulfation, but this will provide you with the enjoyment that you originally purchased your RV for!
Pro-Tip: When you go to charge your batteries do a quick health check on them and a little maintenance. Fill any low water levels with distilled water and clean any residue or corrosion off the battery terminals (or casing) with a mixture of water and baking soda. Always wear gloves, closed-toe shoes, and safety glasses to protect yourself against battery acid.
If you don’t have the freedom or time to use your RV every month, you should remove the battery when not in use, and check the charge on a monthly basis. Typically, your battery will require a top-up charge every three months.
Alternatively, you can buy a battery maintainer, often called a Battery Minder or Battery Tender. These chargers will provide a trickle charge that will keep your battery full without overcharging.
Overcharging Your RV Battery
This leads us to the problems of overcharging. Consistently overcharging can reduce the lifespan of the battery cells and lead you to early and expensive battery replacements.
Inside your RV battery, lead plates are suspended in an electrolyte. Once the battery reaches full charge, the charging current can begin to electrolyze the water in the solution, separating it into hydrogen and oxygen gas. This gas can easily escape the battery casing, lowering the electrolyte levels and exposing the plates, causing further malfunctions.
Not only is this electrolysis harmful to your batteries, but the combination of hydrogen and oxygen gas is highly flammable. It’s possible that any sparks from the battery or charging system could lead to a small but dangerous explosion if your work or storage area is not adequately ventilated.
This is the most easily mitigated danger, and you can prevent electrolysis problems by routinely refilling your battery with distilled or deionized water.
However, there are more severe problems associated with overcharging your battery bank, especially for long, unmonitored periods. The constant current delivered to the batteries can cause the temperature to rise, which might warp the plastic casing. If this breaks the integrity of the casing, the battery’s acid might leak, and the battery will become unusable.
Equalizing Your RV Battery
For all of the reasons mentioned, it’s critical to make sure your batteries are charged to their precise capacity. Many “smart chargers” on the market will do this automatically without the dangers of undercharging or overcharging your RV battery.
Another method you can use to extend battery life and improve your battery’s performance is through regular battery equalization. Battery equalization is the process of overcharging the batteries by 10 percent to equalize the voltage across the internal plates.
Equalization can eliminate sulfation and reverse another problem called acid stratification. This process should be done only by a professional, and only about twice a year.
Methods to Charge Your RV’s Batteries
There are several charging devices or methods available to you:
- Using an alternator
- Hooked up to shore power (using a converter)
- Plugged into shore power (using RV battery chargers)
- Generator power
- Solar panel charging
Alternator Charging
If you’ve ever wondered how to charge recreational vehicles batteries from your vehicle, it’s not complicated. RV battery charging can be done automatically by the alternator while driving. The alternator converts the mechanical energy of the engine into usable electric energy to store in the battery.
There is one caveat to this though – not all RVs facilitate this. So have a good check of your RVs documentation first.
If, however, it does, and you’re planning a long road trip (more than 300 miles) before camping, you’ll almost certainly arrive at your destination with a fully charged battery. However, running your engine idly to charge the batteries is not the most efficient choice.
Shore Power Charging (With a Converter)
However, if you’re planning more than one night at your camping destination without any long-distance driving between nights, you’ll need a secondary method to ensure your RV house batteries are fully charged.
If you’re lucky, your campsite will have electrical hook-ups to charge your battery bank (this will certainly be advertised on location and also on any campground websites). Typically these camp pedestals will have a variety of outlets to suit your battery cables and plug.
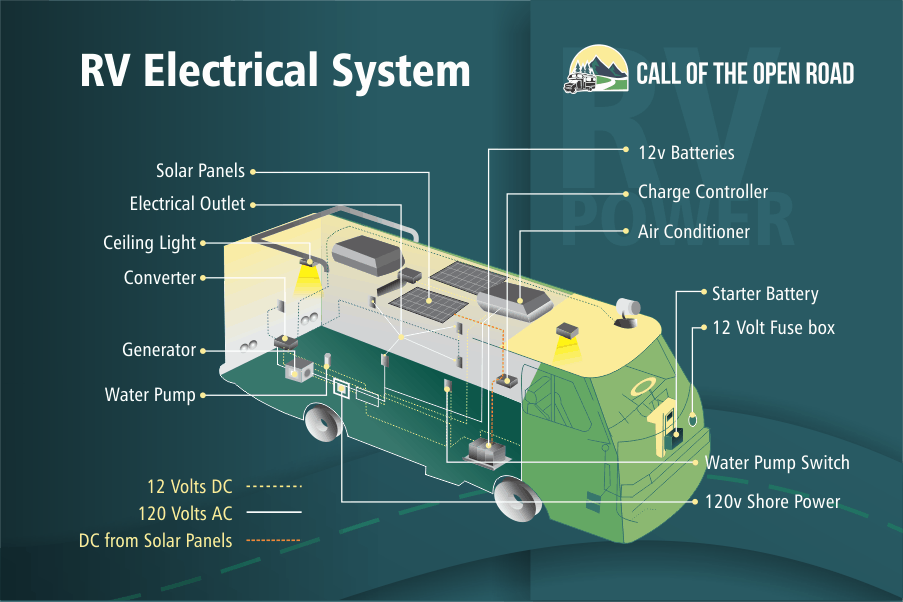
A campground power pedestal will usually provide electricity at either 240-volts or 120-volts and at either 50-amps or 30-amps. As a comparison, an electrical power outlet in the home is rated at 120-volt and 15-amps. All municipal power is alternating current (AC).
Since most of your RV appliances are designed to run from your 12-volt DC battery, you will need a power converter to step down the shore power voltage from 240-volts to 12-volts, and also to modulate the alternating current into direct current (DC).
A converter is great for charging your recreational vehicles batteries while also powering your RVs appliances. But look for a converter that has surge protection as electrical storms or faulty wiring can cause power surges in the campground pedestal that can damage or destroy your RV’s electrical system.
Shore Power Charging (Using a Battery Charger)
Many new rig owners ask, “Does my RV battery charge when plugged in?” The answer is simply, “Yes.” A more important question would be, “Will my RV appliances function with my RV plugged in?”
With a converter, the answer is “Yes.” Travel trailer batteries connected directly to shore power stations using a converter will charge your deep cycle batteries while also providing 12-volt DC power to your RV electrical system.
A battery charger, unlike a converter, will only charge your recreational vehicle’s batteries without powering your RV appliances. When you connect RV batteries and charge them at a shore power pedestal, you should turn off the majority of your power-intensive internal appliances. Even smaller electronics, such as light bulbs, can divert the current that you need to charge your battery.
Whether you’re using a converter or a battery charger, you should include a surge protector to prevent your camper from electrical damage in case of overload. Thunderstorms are much more dangerous for campers than they are for city dwellers because most homes and buildings have some kind of lightning protection built into their construction.
Generator Charging
But what can you do if you’re truly journeying into nature, away from the conveniences of campsites and their electrical hook-ups? You can drag along a generator and some extra fuel, a reliable way to stay charged.
However, battery charging with generators is often noisy and cumbersome. Their presence could detract from your enjoyment of the peace and solitude of nature.
Solar Panel Charging
It’s become popular with some campers to choose renewable energy sources such as wind turbines or a solar power system to recharge their batteries. Although this may not be as reliable as other methods, it’s a cleaner and more environmentally responsible method.
The downside to charging your batteries with solar panels is primarily that you are hostage to the weather. If you’re boondocking down in the southwest where solar power is a pretty reliable power source then no problem. Charging a battery bank with solar panels in more northerly climbs may be a bit trickier.
Another consideration is how large a solar panel array you can have versus your rig’s power consumption. Your house batteries may drain faster than solar charging can replenish them if this equation is tilted towards the consumption end.
Lastly, solar power generation can become an involved process as you need various pieces of kit like a charge controller to help regulate the amount of current and voltage being delivered to your power system. That said, if your camping lifestyle is more attuned to off-grid RVing, then they can make a lot of sense.
Safety
There are several measures you should take while handling and charging your batteries to prevent unexpected danger.
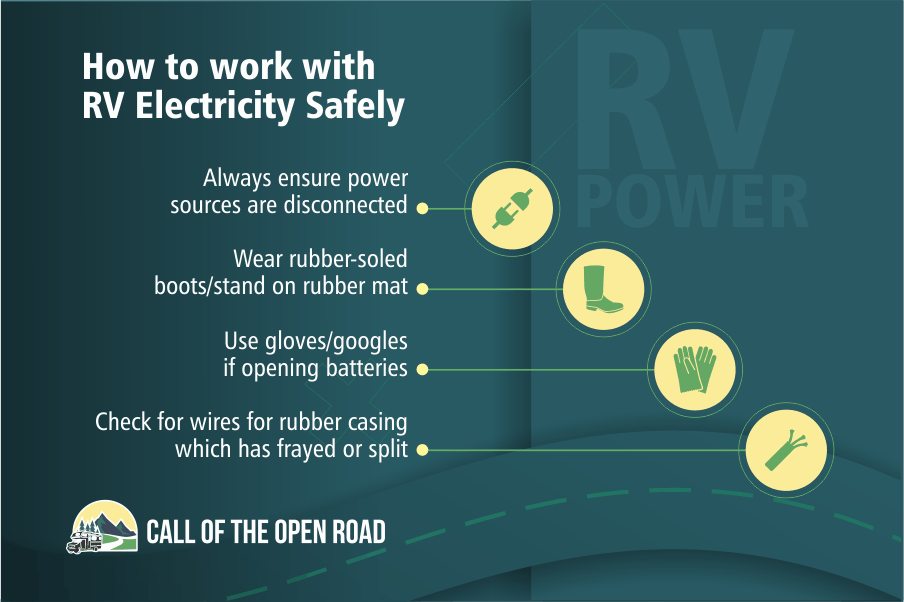
1. Wear safety gear, such as eye protection, gloves, and long-sleeved clothing. Batteries contain sulfuric acid which can burn clothing and skin or cause respiratory tract and eye irritation. Furthermore, connecting the battery leads will often result in sparks. It’s always best to cover your skin and eyes in these potentially dangerous situations.
2. Never lean directly over the unit when changing or charging. As mentioned in the first point, sparks can jump from the battery, so keep your face clear. Additionally, the battery (not to mention the engine) can release hazardous fumes that you don’t want to directly inhale.
3. Make sure the work area is well-ventilated and never near a gas pump. This goes back to the hazardous fumes we just mentioned. Your motorhome is probably parked outside, but it’s always best to consider this necessary precaution.
4. Tighten gas and vent caps first. If the unit is going to spark, you don’t want any escaping gas fumes that could potentially ignite.
5. Use the proper equipment. Properly fitting wrenches are best, but an adjustable wrench is still safer than pliers. A wire brush and a weak solution of sodium bicarbonate in water will help remove sulfation before you begin to charge.
Running at Full Power
If you follow these steps for battery charging and storage, along with all the provided instructions that came with your batteries, you’re sure to enjoy many worry-free trips with your camper for years to come.
We hope that you enjoyed the information in this tutorial. Keeping your rig’s batteries charged and maintained will give you peace of mind when you next go camping. If we can provide peace of mind to our readers, then our mission is complete.
Please leave a comment if you have any further questions or even advice to share with our community. Share this article among your camping friends and family to help them with their deep cycle batteries as well!